Diesel pump top leak fix ( courtesy of R.Ambrose )The injection pumps on most Japanese vehicles that are not goods vehicles are based on the Bosch ‘VE’ patent, so seals etc. fit all makes of that design and can be sourced in many places. (Same goes for Denso or Zexel pumps on a lot of Toys).
Note, this does not involve removing the pump or upsetting the injection timing. So the front shaft seal is not part of this fix. If you have diesel getting into your sump then you have to remove the pump and get it to a good diesel shop to get the shaft seal fixed, and pump re-calibrated whilst you are at it..
So if you can't get to a shop or can't afford to go to one but have got the required seals to do a leak on the top, here is a quick run down on how to do it on the side of the road.
You will need ...
* 5mm allen key preferably of the socket type variety,
* 10mm combi spanner,
* 6 inch steel rule or similar thin flexy short steel strip,
* 8-10mm pin punch (can be useful but not essential),
* Small hammer (can be useful but not essential)
* 17mm combi spanner (can be useful)
* needle nose pliers,
* a pair of fairly small screwdrivers,
* wife's fingernails - or grow your own !
* felt tip pen.
First of all, give the whole area a good cleaning with gunk or similar degreaser spray and then hose off and run the engine till all the area is dry - except for the diesel leaking out of course !
Here goes ...
disconnect return line and fuel leak-off rail hose (can remove banjo bolt and banjo if you feel it makes the job easier) & boost enrichment aneroid hose if applicable. But best to leave them all fitted if you can get at the allen cap screws on the top plate.
No point in going into the detail of removing all the accessories etc on top of the pump. If you are attempting the job I accept that you are sensible enough to dismantle the minimum, take precautions and note where each bit is removed from. (We are sensible Paj owners after all, aren’t we?)
Remove linkage from throttle arm.
Look at the throttle arm and study where the throttle return springs sit, remove the end that is hooked around the top of the pump top cover, the throttle arm should now move quite easily with a little spring tension at the full throttle end of travel. (With practice you may choose to leave the springs at full tension and lift off the arm and re-install the same way).
Look carefully at the throttle arm shaft and you will see a groove machined across it (if it is obscured by yellow paint scrape it off) get the ruler and draw a line on the throttle arm with the felt tip pen to line up with the machined groove, this is so you can reinstall it on the same spline. (There may well be a witness mark already scribed on the throttle arm anyway). If lined-up wrong it will either not idle or idle way too fast, but no big deal to work-out later.
Remove the 6mm nut and lift off the arm making sure you keep track of where the springs go.
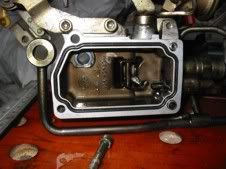
Undo the 4 m6 cap screws holding the top on ( if they won't come, tap the heads of the cap screws with a pin punch and they will undo easily), as you lift it off, push the throttle shaft down through the top cover, on autos or vehicles with air conditioning you may have to remove 2-3 m6 bolts or cap screws to get rid of the A-C idle up actuator or the kick down cable bracket. You may also have to reverse the idle and max speed screws to get at the cap screws, if so, mark their length so you can refit at the same spot.
Pull out old seal from the cover top and replace, most of the time they have flopped on their side and hence leak, install the new seal, they have superseded the old design so they don't fall over anymore. There are small roundish nibs moulded into and either side of the seal. Its these you need the fingernails for ! A small screwdriver will cut them and defeat the object of the exercise. The rounded end of the 6 inch rule might just be usable for the job, but something straight round-edged and pliable is best - back to the wife ! (sorry, her nails that is).
Replace throttle shaft 'O' ring. Reinstall top plate (this is where the swearing may or may not start) put a little diesel on throttle shaft and feed it up through its hole as you lower the top on, at which point you will notice it won't go on. Don't panic yet, tip it up on the front outside corner and try to lower it on rear inner corner first if it still will not go. The max fuel screw tends to catch on the linkage the throttle arm pulls on, holding it up, get your 6" steel rule and slip it in to push this arm forward as you lower the top, now it will drop on. (Well, it could be the third attempt!) If still no joy, walk away and come back in 5 minutes and have another go, it might take you one go or 10 but it will eventually go on.
Hold the top down as you get the 4 cap screws reinstalled.
Line up your marks on the throttle arm and shaft and reinstall the nut, leave the springs disconnected for the moment, refit your fuel lines and start it, if it idles fine you're on the right spline, if not recheck your marks.
Reassemble in reverse order from there.
There are 2-3 other o-rings, one under the cold start advance unit (if applicable) one at either end of the advance mechanism, all three o-rings are the same but they rarely leak compared to the top cover gasket.
Put 2-3 hours to one side for your first one, with practice you will be done in about 90 minutes on a turbo pump and under an hour on the non-turbo's.
Diesel fuel pump seal top leak fix..... add on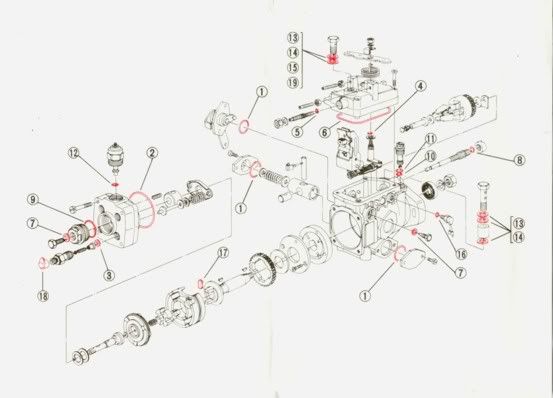
No. 146600-1120 ZEXEL REPAIR KIT
1 146600-0800 O-ring QTY3 Timmer cover CSD cover
2 146600-0000 O-ring QTY1 Head
3 146433-0100 Gasket QTY6 D•V•H
4 146600-0100 O-ring QTY1 Control lever Shaft
5 146600-1200 O-ring QTY1 Full load adjusting Screw
6 146600-4400 Seal Ring QTY1 Governor cover
7 026508-1140 Gasket QTY3 Pivot bolt Air drain head
8 146600-0400 O-ring QTY1 Governor Shaft
9 146600-0500 O-ring QTY1 Head Plug
10 146600-0600 O-ring QTY1 Regulating Valve
11 146600-0700 O-ring QTY1 Regulating Valve
12 146600-1700 O-ring QTY1 Solenoid valve
13 026512-1840 Gasket QTY5 Fuel inlet, Outlet
14 139512-0200 Gasket QTY5 Fuel inlet, Outlet
15 029331-4010 Gasket QTY2 Fuel Outlet, Solenoid timmer
16 146600-1300 O-ring QTY1 N-Picup
17 146202-0100 Damper QTY2 Gear
18 029921-2010 Cap QTY6 Holder, D-V
19 139514-0200 Gasket QTY2 Fuel Outlet, Solenoid timmer
I don’t know if it should read timer and Pickup but that’s what was on the diagram supplied with the seals
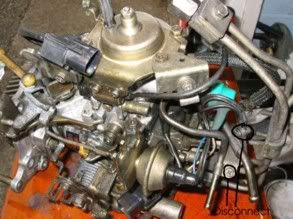
With the pump out give it a good scrub with degreasant.
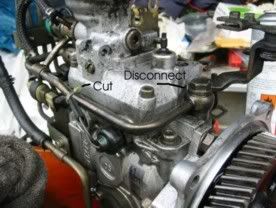
Disconnect the clips holding the 2 metal water pipes and disconnect the banjo bolt around the other side.
You may not have these fitted

Disconnect the terminal under the green boot

Unhook the top spring. Get the tipex/felt pen to hand.
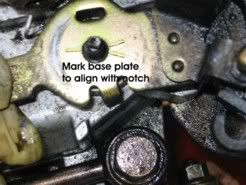
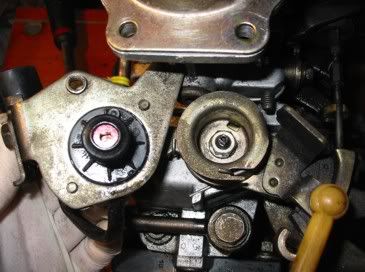
Press down on the base plate to keep it still while undoing the nut.
Keep holding it down and lift off the top spring exposing the base plate.
Mark the base plate so you can install it on the same spline.
If lined up wrong it will either not idle or idle way to fast but can be adjusted when on the car.
Unhook the lower spring and lift off.
Undo the 4 allen key bolts (5mm allen key) holding the top on. They are all the same length.
As you lift it off, push the throttle shaft down through the top cover. Fuel will leak out at this point!

Jonscw states in his post of 2-3 other o-rings that can be changed. One under the cold start advance unit (if applicable) and one at either end of the advance mechanism. All three o-rings are the same but they rarely leak. I wasn’t sure where these are and as they rarely leak I left it.
Smear some fuel around both new seals.
Push the throttle shaft back through the top cover.
Hook a piece of string around the throttle arm linkage. No knots though.
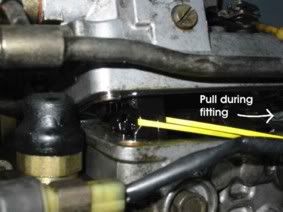
As you lower the top cover it will hit the throttle linkage.
Pull on the string and it will drop down.
Carefully pull the string out.
Bolt the 2 halves together.
Fit the throttle base plate and lower spring. Make sure the spring is hooked correctly and sides of the spring are contained under the base plate.
Line up the shaft with your marks and hold down.
Pick up the upper spring assembly.
Place assembly over shaft, Hook spring end around pump body. Still holding onto base plate.
With slight downward pressure gently rotate upper spring assemble anti clockwise until the keyway engages with base plate.
Still holding fit the spring washer and nut to secure it all.
Re-fit the black electrical thingy on top of the springs (A/C idle up actuator?).
Note there is a slot in the bottom, which needs to line up with the throttle shaft.
Moving the base plate may assist in getting it located
Re fitting the rest is straightforward.
Do check before fitting pump that everything is tight. You don’t want to take it out again to fix leaks caused by a loose fitting!
If when you first run the engine, it doesn’t want to idle then you can re-position the throttle base plate in situ.
Obviously the intercooler has to be off.
Get the electrical harness out of the way.
The boost hose into the top of the fuel pump can be left as can the coolant pipe.
Disconnect the black throttle cable and the plastic dog bone linkage.
Very carefully remove the spacers on the black electrical thingy on top of the springs. (A/C idle up actuator?) and then remove the actuator.
Be very careful not to drop the spacers.
Only the top spring needs to come off.
Push down on the base plate to stop it moving as you remove the spring assembly.
You will only need to rotate the shaft a spline or 2.
Rotate the shaft anti clockwise to increase the rpm.
Refit and test.
Do have a check for leaks before fitting the intercooler.


